Ghostly roasted beets with whipped feta and pepitas

ghostbeet2
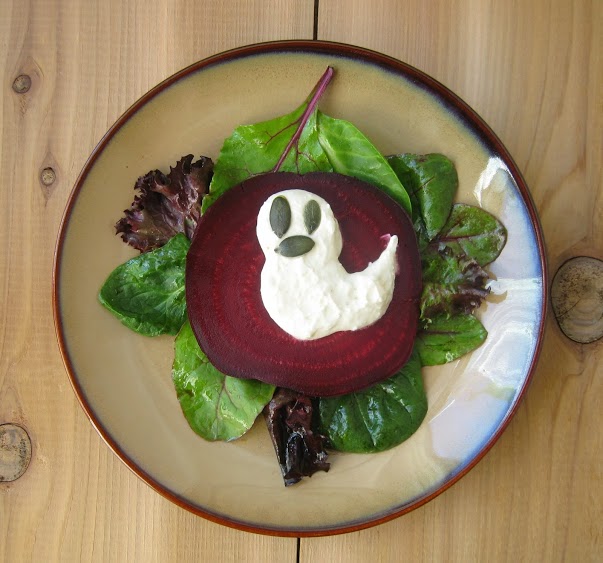
[pinny url=”http://74.48.178.175/2013/10/29/” media=”http://74.48.178.175/wp-content/uploads/2013/10/ghostbeet2.jpg” description=”Ghostly beet salad -lollipopsicle.net”]
Halloween is only three days away and I wanted to make sure I got another “spooky” food idea up before the season is over. I love beets, I have many a post dedicated to them and here is one for Halloween. Fun enough for the kids and still sophisticated enough for adults this recipe is a win, win. I got some amazing loose beets from Chuck’s over the weekend, they were huge, local, red beets the size of a softball! I roasted mine whole, which ended up taking about three hours! You can easily roast your beets ahead of time and refrigerate so you they will be ready whenever you need them. Aside from the roasting time this recipe is super fast and simple.

You will need:
1 large beet (softball sized) you could use two smaller ones but they might be a little harder to decorate.
4 oz. crumbled feta cheese
1/4 Cup cottage cheese
a few handfuls of salad greens, arugula, spring mix, whatever you like.
3 tbsp. olive oil
2 tbsp. Balsamic vinegar
a handful of pepitas (pumpkin seeds)

Heat your oven to 375 degrees, stab beet a few times with a fork and wrap whole in aluminum foil, roast about three hours or until easily pierced with a fork. Cool a while then peel, while beet cools, in a blender place feta with cottage cheese and blend until smooth and whipped up, refrigerate until ready to assemble. Slice beet into four slices, in a bowl whisk olive oil and vinegar together, add greens, salt, and pepper. Distribute dressed salad evenly over four plates, top each with a slice of beet, and using a ziplock bag with a hole cut on one end or piping bar, pipe ghosts on and top with pepitas for faces. Enjoy your Halloween with this fun salad!

Romanesco cauliflower with lemon and herb dressing

IMG_6219 (2)
 [pinny url=”http://74.48.178.175/2013/10/27/romanesco-caul…-herb-dressing/” media=”http://74.48.178.175/wp-content/uploads/2013/10/romanesco.jpg” description=”Romanesco Cauliflower salad -lollipopsicle.net”]
Went to a great store in Vancouver today, it called “Chuck’s” and it is on a whole different level of awesome then what I am used to. Not only is the help friendly and attentive, but they are locally owned and apparently have great relationships with the local farms. I found the most amazing romanesco cauliflower today that was locally grown and sixty nine cents a pound! Romanesco is a beautiful variety of cauliflower having a strange and almost “other world” fractal shape, it can be used the same way as you would your run of the mill cauliflower and is full of nutritious vitamins and fiber. I love it and it is in season right now! I chose to keep it simple, blanching the romanesco and then dressing it with a light lemon and olive oil dressing with tons of fresh herbs and nutritional yeast. This dish is great warm, cold, or room temperature!

You will need:

1 head romanesco cauliflower cut into florets (about two pounds)
2 oz extra virgin olive oil
juice of one lemon
1 T capers
1/4 teaspoon red pepper flakes
2 T nutritional yeast flakes
1 clove garlic, smashed
1 T fresh dill, roughly chopped
1 T flat leaf parsley, roughly chopped
salt and pepper to taste

In a large pot boil three cups of salted water, add cauliflower, cook 5 minutes, drain and rinse with cold water (helps retain bright color). Combine the oil, lemon, and garlic in blender, pulse a few times add yeast, capers, and red pepper flakes, pulse. Toss cauliflower with dressing, add herbs, and salt and pepper to taste. Easy and delicious way to try out this seasonal gem!

Focaccia I gotcha!

focaccia
[pinny url=”blog.magicman.antsle.us/2013/10/23/focaccia-i-gotcha/” media=”http://74.48.178.175/wp-content/uploads/2013/10/focaccia.jpg” description=”No Knead Foccacia -lollpopsicle.net”]
Well after last week’s focaccia fail I was determined to get it right this time. Throwing out all those ingredients is wasteful and totally annoying, not to mention the labor involved. But there is no use crying over ruined bread right? So onward and upward, I decided today was the day! I was planning on doing a minestrone with fava beans and tons of veggie goodness, so a sidekick of focaccia would be ideal. I went down to the store, not before I stopped at the carts by my house to try the much hyped Bridgetown bagels, I am happy to report they are totally worthy of the buzz they are getting, amazing! Even with the limitations of making them all in their smallish cart, these guys are busting out the best of the best in Portland. I was inspired! Determined to not fail, I picked up some yeast, Bob’s Redmill flour and went about my business, and I must say it was a success, I’ve eaten better focaccia in my life, but my biggest critic (Ava, my six year old) ate a giant piece, so already it was good enough to eat! This recipe is easy, no kneading, lazy man style. Almost idiot proof, I say that because bread baking and I aren’t exactly besties, this is a great recipe for beginners.
You will need:
7 cups bread flour
2 tsp. or two packet dry yeast
3 ½ cups of water, I used some flat beer that got left out overnight for 1 cup of the liquid, make sure your liquid is very warm to the touch but if it burns you too hot, can kill your yeast.
2 tsp. fine grain salt
1 tbsp. coarse salt (for sprinkling on top)
½ cup olive oil
In a mixer outfitted with a bread hook, add your flour and salt, combine. Add yeast to liquid and stir, let stand until a bit foamy and bubbly, add to flour and salt, mix first on low for a few minutes then medium until it is well mixed….about 10 minutes total. In a bowl add half of the oil, pour dough in (it will be loose, kinda like that sci fi movie from the 50’s called “The Blob”), cover with a clean towel and let rise in a warm place for two or three hours, at that point it should be more than double its original size. Use a bit of your remaining oil to grease a sheet pan, add dough, top with additional oil, press with fingers to make dimples all over the dough, sprinkle with coarse salt. Pre heat oven to 400 degrees, bake bread about 40 minutes until golden brown. Tada! BREAD! Woot Woot!


Fresh Cranberry compote with lemon zest and red wine.

WP_20131022_017
[pinny url=”http://74.48.178.175/2013/10/22/fresh-cranberr…t-and-red-wine/” media=”content.lollipopsicle.net/ap-content/2013/10/WP_20131022_017.jpg” description=”Cranberry compote with Red wine”]
What would Thanksgiving be without cranberries? It is a must have for most, but if you are still opting for the canned variety (which I grew up on) you are missing out on a whole level of awesome that their fresh, whole berry, counter part offer. Cranberries are tangy, healthy, and have an amazingly long shelf life, despite a small harvesting season. I live in cranberry country up here in Oregon, but most times they are available all over the states and when they are, grab two bags, one for now and one to freeze for later! I’m highlighting my cranberry compote with red wine, wine pairs amazingly well with the tannic nature of the berries. This sauce or compote as I like to call it is great on turkey of course, but also amazing with roasted meats of all kinds or even seitan if you are plant based. This compote keeps well in the fridge and is ideal for canning, so you can always have it on hand. It’s also incredibly simple. So try this for your Thanksgiving holiday and impress your guests!

You will need:  12 oz fresh Cranberries 1 Cup red wine, pinot noir or beaujolais works well. 1 Cup sugar zest and juice from half a lemon pinch of salt
You will need:
12 oz fresh Cranberries
1 Cup red wine, pinot noir or beaujolais works well.
1 Cup sugar
zest and juice from half a lemon
pinch of salt

Method:
In a medium sauce pan combine all ingredients, bring to a boil, reduce heat to medium low, simmer 15 to 20 minutes till the natural pectin in the berries is released and sauce is thick and shiny! For a low sugar, no alcohol version, try 1 cup of apple juice in place of wine! Full of health benefits cranberries are a great addition to Thanksgiving or any meal really, even good on ice cream! Try this its easy, cheaper, fresher, and most importantly tastier then any pre-made sauce I have met.

Autumn apple crisp

WP_20131017_012
[pinny url=”http://74.48.178.175/2013/10/17/autumn-apple-crisp/”media=http://74.48.178.175/wp-content/uploads/2013/10/WP_20131017_012.jpg”” description=”Apple crisp -Lollipopsicle.net”]
Well it’s apple time here in the Pacific Northwest! We went out to Sauvie Island on Tuesday to get some obligatory pumpkins, but what caught my eye were the apples! At a mere $1 a pound they called out to me like the sirens to Odysseus…needless to say I bought some and figured an apple crisp was in order. A simple concoction of apples, oats, sugar, butter and flour, it is a wonderfully less cumbersome alternative to a pie. The aroma it exudes in the baking process is enough to make it worth making, but then you taste it, you know that if Fall had a flavor this would be it. I made mine in my Le Creuset soup pot, it’s a deep, circular, enameled cast iron pan that is a good size for this, you can do this in any pan really and just adjust the amounts of apple and topping, to make the amount in this recipe you need an 8 by 8 or 9 by 9 incher.
You will need:
apples
[pinny url=”://blog.magicman.antsle.us/2013/10/17/autumn-apple-crisp/”media=”http://74.48.178.175/wp-content/uploads/2013/10/apples.jpg”description=”Autumn Apple crisp lollipopsicle.net”]
Apple mixture:
6 medium to large size apples, peeled, cored, sliced. Mix up the variety as you like, I used gala and braeburn, stay away from red delicious, because basically they have no flavor profile and suck in general.
Juice of one lemon
¼ cup sugar, I used a less processed cane sugar from Florida, but you can use sugar in the raw, or even granulated.
1 tsp. cinnamon
1 tsp. apple pie spice, or use ¼ tsp. ground cloves, and ½ a tsp. ginger.
Goo of a vanilla bean (optional, but highly suggested)
Pinch of salt
3 tbsp. flour, I used “white” whole wheat
1 tbsp. cornstarch.
Use a bit of butter, or cooking spray to grease your pan, add all of the other ingredients, mix well, making sure each piece of apple is well coated. I do this in the pan to avoid more dishes to wash, you can use a separate bowl to mix as well.
Crumb topping:
1 cup oatmeal
½ cup flour
¼ cup slivered almonds
½ cup brown sugar
Pinch salt
6 tbsp. butter of choice
WP_20131017_004
In a medium bowl combine above ingredients, using fingers or a pastry cutter, mix until butter is in “pea sized” chunks. Evenly distribute over apples, and bake 60 minutes in a pre-heated 350 degree oven.
The end result is a beautiful way to highlight the nuances of an apple’s peak season. This is a great alternative to a pie at Thanksgiving as well! Enjoy!

2013-10-17 (1)

Tofu Tom Yum-my ramen

tomyummy
[pinny url=”http://74.48.178.175/2013/10/13/tofu-tom-yum-my-ramen/” media=”tomyummy” src=”http://74.48.178.175/wp-content/uploads/2013/10/tomyummy.jpg” description=”Tofu Tom Yum with Ramen noodles”]
I’ve been watching the PBS series David Chang (chef/owner of Momofuku) did in 2012, and he had a really fun and non-pretentious view of instant ramen, yes that dried stuff with the salty silver packet of seasoning that you get 6 of for a $1. He described instant ramen as what “Mac and cheese” was for most kids was ramen at his house, he talked about eating it raw, cooked, etc. We followed David as he ate ramen at all the best spots in Japan (where he worked at ramen shops early in his career) and his overall appreciation for it in all forms. I ate a lot of it growing up, one of the first things I learned to cook was instant ramen, there always seemed if nothing else, a pack of ramen would be lying around. I also love Thai tom yum soup, and one of my friends requested a recipe for it. I actually have never made it, but after a fun trip to the Asian market by my house I got all the ingredients I needed and it was super easy to make. You of course don’t need to add the noodles, when I eat Tom Yum at restaurants it is usually served with some steamed rice, so of course if you want you can sub that or not….this again is a guideline to inspire your own individualized creations. All I can say is this was super tasty, easy, and as long as you can read and get to an Asian market, can be easily recreated at home!
mise
You will need for 2-3 servings:
4 Cups water
1 Tbsp instant Tom yum paste, I got a Thai import that was amazing and only $1.69 for a jar that stays well in the refrigerator whenever you need it. Most pastes consist of shallots, lemon grass, kaffir lime leaves, chilies, and dried shrimp paste, you can easily find the vegetarian version if you want to this to be vegan.
½ brick medium firm tofu, cut up into large bites
2 green onions, sliced, green part set aside
¼ Cup bamboo shoots, my market has fresh ones for $1.39 a lb you can of course use canned, or leave them out completely if you no likey.
A handful of canned straw mushrooms, I got unpeeled ones, they were super tasty!
A handful of canned baby corn, sliced
3 or 4 fresh shitake mushrooms, woody stems removed
Two packages ramen, discard seasoning or save it for a rainy day….or whatever.
A handful of cherry tomatoes cut in half, or use a regular tomato, the ripest and tastiest I could find were cherry
Cilantro, enoki mushrooms (optional) and lime to garnish
Method:
In a medium sauce pan boil your water, paste, shitake, white parts of onion, when boiling add tofu, add two bricks of ramen, cook 2 minutes or so. Distribute the noodles and goodies evenly between two or three bowls depending on how much you can snarf down in a sitting. Serve with cilantro maybe some enoki mushrooms (I love them, you can cook them a bit if you want or leave them out completely), and some lime wedges. Seriously SOOOOO TASTY! Be ready for a spicy good time, and of course you can adjust the amount of Tom Yum paste to suit your individual palate. Thanks Dave for reminding me of the awesomeness that is instant ramen and Courtney for the idea.
eats
[pinny url=”http://74.48.178.175/2013/10/13/tofu-tom-yum-my-ramen/” media=” http://74.48.178.175/2013/10/13/tofu-tom-yum-my-ramen/” description=”Tofu Tom Yum with Ramen”]

Avgolemono chicken soup with quinoa and wild rice

avgo2
Fall is soup season, so today I made a take on one of my family’s favorite. Avgolemono is a Greek way to thicken sauces or broths with eggs and lemon. When done correctly, the result is velvety texture with a kick of citrus. One of my early posts here explains how to make dolmathes with avgolemono sauce, and basically this is the same technique applied to soup. I used to work at a bagel shop back in High school and our most popular soup by far was creamy chicken with wild rice, so I figured if I married the two ideas it would be delicious. I used tru roots sprouted wild rice with quinoa and threw in some leeks, it turned out delicious. Give this a try and I think you will be glad you did!

You will need:
8 cups stock, I used a blend of veggie and chicken
1 cup wild rice blend or rice or quinoa of choice, orzo is also really good in this
1 carrot, peeled, medium dice
1 rib of celery, medium dice
1/2 medium onion, diced
1 leek, cleaned, and sliced into half moon shape
4 eggs
juice of two lemons
salt and pepper to taste
dill and parsley for garnish
2 cups shredded chicken, rotisserie works great for this or you can leave it out completely if you want a vegetarian friendly soup

Method:
In a soup pot add rice and stock, bring to a boil, reduce heat to medium, simmer 10 minutes, add veggies, cook 10 or so more minutes or until rice and veg are no longer crunchy. Crack four eggs into a medium bowl, add lemon juice, and whip well, you can use a blender if you prefer, make sure it is light yellow in color and foamy. Temper 2 cups of soup broth into egg mixture, by pouring it slowly, but continuously into eggs, once combined add back to soup pot and simmer until thickened.
avgo
I really like how the different rice turned out in this, the quinoa gave a great texture and next time I don’t think we would even need to add the chicken. Try this Greek diner classic at home tonight! It is a total crowd pleaser and is perfect for cold fall nights.

Mummy Calzone with bloody Bolognese

mummy5
I love Halloween! I always have, and one of the best parts of it for me is creepy food! I remember going to Halloween parties and drinking dry ice root beer and bobbing for apples. Halloween is the holiday that was always made a “big deal” of in my family growing up, when we had our restaurant my mom would make sloppy joe’s (which I never liked much, but I would call them brains) for fifty and her famous pasta salad. My sisters and I between sips of apple cider would spread those spider web decorations over the whole house and hang scary paper cut outs of witches, ghosts, and Dracula. I remember many a cool October night in Northern Utah, hopping from house to house trick or treating before we went home to do some candy swap out negotiations. My mom always has great Halloween parties, but now being a few states away I must carry out traditions for my kids. I am really not much of a decorator, but I definitely like to do some fun food! This one was inspired by a “Halloween party ideas” book from the 90’s, thinking it was some sort of marketing for Pillsbury or something, my sister and I made one of these about a decade or so ago, but I think I found a way to make one that will suit everyone’s personal tastes.
You will need:
1 package pizza dough, I used Trader Joe’s it makes one 12 inch pizza, so if you are making your own, most recipes make enough for two mummies.
2 cups pizza toppings of choice, I used ¼ Cup pesto, ½ cup sautéed spinach, 1 shallot, sautéed, 2 oz mozzarella, 1 oz feta, one green olive with pimento cut in half (eyes), one pepperoni cut in half (mouth), one cheddar stick cracker (Egyptian Crook that mummies hold) . You can use anything you like and personalize your mummy.
2 cups Bolognese, or any recipe you like.
Pre-heat oven to 400. Roll dough out with a little flour if needed into a rectangle about 12 x 9 inches, prep a baking sheet with parchment or cooking spray, place dough on sheet. Cut dough rectangle into 10 strips as shown in photo:
mummy1
Spread topping out evenly:
mummy2
Weave strips of dough over each other and ingredients:
mummy3
Make sure you shape your head with dough and place desired facial features and crook (cracker), bake twenty minutes, serve with a bowl of heated Bolognese and enjoy at your next monster mash!mummy7

mummy6
Kids love them!
kids4

kids3

kids2

kids1

Mu Shu Vegetables (Vegan but you would never know it!)

mushu2
Awww, Chinese food! I probably ate more Americanized Chinese as a kid then at home, so for me Chinese take-out or eat in is total comfort food. My mom worked at a restaurant called “China Nite” in my hometown, and even though it had been decades since she worked there, we would eat there often. It has since been knocked down, and the giant Hoi Toi statue is sitting in a junk pile somewhere. After “Nite” closed, we started to venture out to other local options, one being “Golden Dynasty”, in high school my bestie Holly and myself would go there for hot and sour soup and Mu shu pork. Mu shu is my favorite order and I have had it many places, a great veggie option as it is full of flavor and super easy to recreate at home. So I am going to share my no fail, easy, plant based version of this comfort classic.
mushu1
You will need for six wraps:
6 flour tortillas, or rice flour wrappers (Asian market), I used the Tortilla land brand that you cook at home. Use whatever you like, you can also healthify even more with whole grain varieties.
1 small head of cabbage, shredded or if you need to be super duper fast use a good quality bagged “coleslaw” variety, it will work fine.
1 carrot, shredded (if you are using bagged slaw you can omit this)
5 green onions, white parts cut lengthwise, green parts sliced.
8 shitake mushrooms, stems removed, tops sliced.
1 Tablespoon, fresh ginger, grated.
2 cloves garlic, minced.
1 Tablespoon vinegar, I used red wine, but rice wine is optimal, use what you have, but not balsamic.
1 Tablespoon soy sauce
2 Tablespoons, plus a bit extra for the wrappers, Hoisin sauce.
2 teaspoons, toasted sesame oil.
Sesame seeds for garnish.
Asian Micro greens for garnish, totally optional.
1 block of tofu, sliced, I baked ours but you can fry or choose your own method, you can also substitute whipped eggs if you prefer, but if you are new to tofu this is a great way to introduce your family to it.
A few tablespoons of cooking oil.
In a large skillet or wok over high heat oil till shimmering, add ginger and garlic, add white parts of green onions, add mushrooms, cook a few minutes till mushrooms brown a bit, add sesame oil, cabbage, carrots, cook a few minutes, add vinegar and soy, stir, add tofu and 2 T of hoisin sauce, combine, add green parts of onions, test for seasoning adjust with salt and pepper if needed. Remove from heat. Warm your wrappers of choice, divide filling evenly into wrappers and top with a bit of sesame seeds and hoisin. Rock and roll em’ up…gobble em’ up!
You won’t ever need to order take-out again! These are fast, easy, and full of veggies and flavor!
mushu

Southern style pasta bake with broccoli and cheesy, curry cream.

shells3
Ok, well the outlook is cloudy, with an outstanding chance of rain….for the next six months! So on that note I think this calls for a month of comfort foods. I will be putting my own spin on them and sharing many of my family’s favorites. I will sneak our veggie friends into as many as possible, don’t get me wrong these are not low fat, or anything, but I think the way to get folks into veg is to place them in something they already love and show them that veggies have a sultry side. Comfort foods is by far my best category, as I first started with these types of recipes when I started cooking independently (Age 8), and I love the non-pretentious joy that it brings to diners. Cooking for me is about love, it is a hand crafted way I can make people happy with media I understand. So try this out, if you can boil water and stir, you can easily recreate this for your loved ones, or whoever shows up…haha! Easy!
Serves 4 as main 6-8 as a side dish
• ½ of a 16oz package dried small shell pasta, or macaroni
• 3 cups broccoli florets, I used frozen from trader joes and cut them a bit smaller
• 2 cups shredded or grated cheese, use your favorite or a blend of several! Cheddar should be a player.
• 3 eggs
• 1 cup of milk
• ½ cup of sour cream
• 1 tsp. curry powder
• ½ tsp. salt
• ½ tsp. pepper
• Dash hot sauce
• ¼ cup parmesan or other salty hard cheese
• A dash or two of smoked paprika
• 2 tbsp. chopped parsley
Pre-heat oven to 350. Prep a casserole dish by greasing it with butter, or use cooking spray. Boil salted water, add pasta cook 6 minutes, add broccoli cook 1 more minute, drain. In a large bowl, add hot pasta and broccoli to 2 cups of cheese, stir, and place in casserole dish. In a mixing bowl add milk, eggs, sour cream, salt, pepper, hot sauce, and curry. Whip up omelet style, we are in essence making a soufflé of sort, and pour over pasta mixture, top with parm, paprika and ½ the parsley, bake 45 minutes, top with rest of parsley and serve! This is a really fast, easy, and tasty way to make mac and cheese as there is no béchamel to make. I read in the South this is a popular Thanksgiving side dish (regular mac and cheese variety) so it would be a great vegetarian option and mine is kicked up with some curry, hot sauce, and veggies to boot!
shells2